Deploying the HelloWorld Smart Contract Example
Now let’s look into deploying the HelloWorld Smart Contract in C# on your local network, firstly, let’s take a look at the contract itself.
How the concept of a class links to a smart contract
Smart contracts in C# are intrinsically linked to object-oriented design even when they are very basic.
Being object-oriented also enables smart contracts to inherit methods and properties. This allows a level of basic smart contract functionality to be readily available to all smart contracts via base class methods and properties.
The smart contract constructor
Deployment of a smart contract involves calling the constructor for the smart contract class. This is where any initialization of the smart contract should take place. Before we look at what the constructor does, let’s examine its syntax.
Firstly, as previously mentioned, all smart contracts in C# inherit from SmartContract. It is mandatory to include the following line at the top of the file:
using Stratis.SmartContracts;
This allows a smart contract to inherit from the base SmartContract class.
The class declaration specifies that your class inherits from the SmartContract class:
[Deploy]

public **class** **HelloWorld** : SmartContract

{

...

}
The [Deploy] attribute only needs to be specified when more than one
class is declared in the file, but specifying it anyway is fine. When a
smart contract is deployed, the entire C# file is compiled into Common
Intermediate Language (CIL), which is then supplied to the deployment
call.
The first parameter passed to the constructor must be an object
conforming to the ISmartContractState interface:
public HelloWorld(ISmartContractState smartContractState)

: base(smartContractState)

{

...

}
You can define additional parameters, and when you deploy the smart
contract, you only need to specify arguments for the parameters you
defined. The first parameter is handled internally. The base constructor
(the SmartContract constructor) must also be called with
the ISmartContractState parameter, and you can see this in the code
above. The name of the first parameter could theoretically be changed,
but smartContractState will work fine.
Greeting - a smart contract property
In our Hello World example, we do one thing and that is initialize
the Greeting property:
this.Greeting = "Hello World!";
The actual line initiating the Greeting property is fairly
self-explanatory. Let’s take a look at the property getter and setters.
private string Greeting

{

get

{

**return** this.PersistentState.GetString("Greeting");

}

set

{

this.PersistentState.SetString("Greeting", value);

}

}
The PersistentState property belongs to the SmartContract class and
facilitates the storage and retrieval of data (in this case a string).
Smart contract data is stored as a series of key-value pairs and in this
case Greeting is used as the key. The Greeting property is marked as
private as there is no need for it to be accessed from anywhere other
than inside the smart contract. Unlike methods, C# properties on a smart
contract cannot be called even if they are public.
SayHello() - a smart contract method
Finally, let’s look at the simple method Greeting(), which returns the
“Hello World!” string.
public string SayHello()

{

**return** this.Greeting;

}
As you can see, this method just accesses the Greeting property.
You can see the complete Hello World Contract code here.
Compiling the HelloWorld smart contract
A smart contract in C# must be compiled into CIL before it can be deployed. For this, we are going to use the Stratis Smart Contract Tool.
You will need to obtain the Stratis Smart Contract Tool, this can be done using the below command
git clone https://github.com/stratisproject/Stratis.SmartContracts.Tools.Sct
Follow below steps to validate and compile Smart Contract:
cd Stratis.SmartContracts.Tools.Sct\Stratis.SmartContracts.Tools.Sct\
dotnet run -- validate [PATH_TO_SMART_CONTRACT] -sb
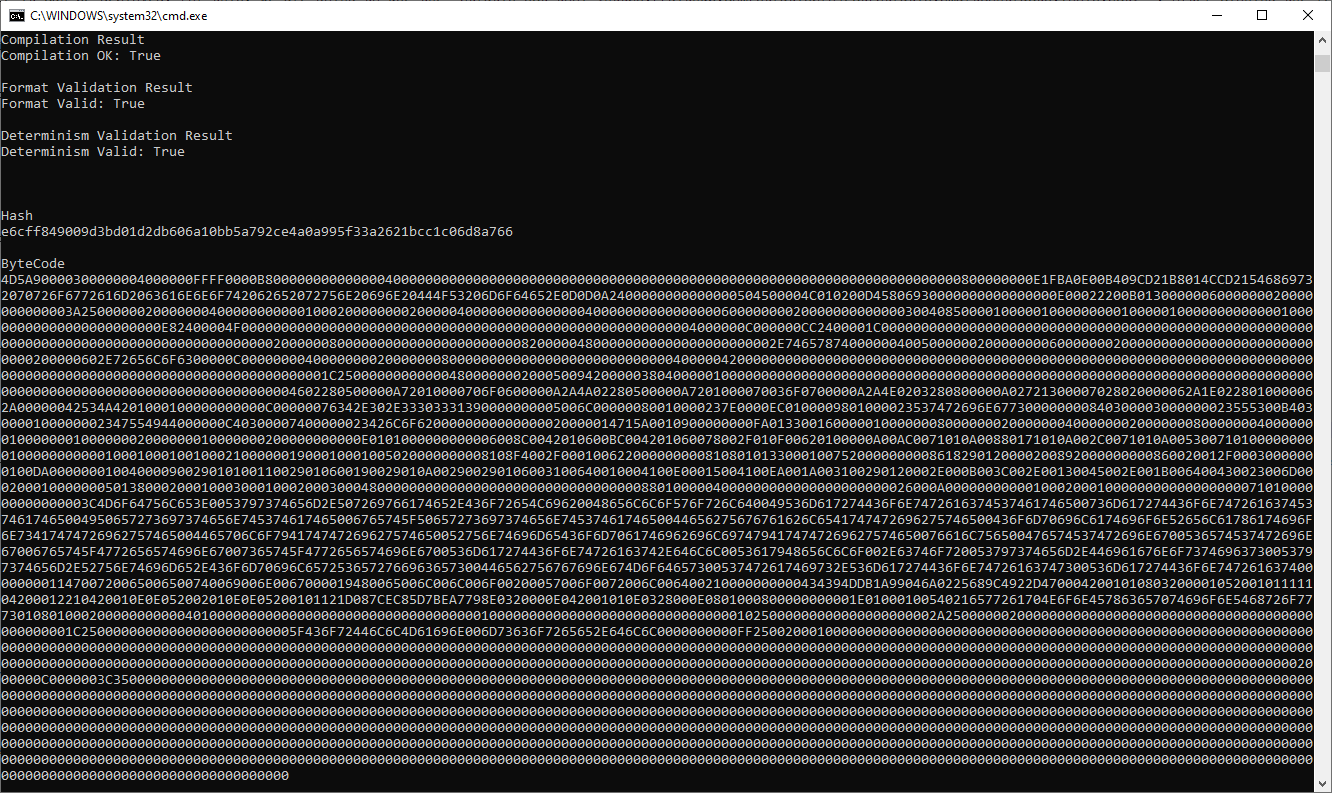
To see more information on the options available for the sct validate command, use the following command:
dotnet run -- validate --help
Note
If you are building the Stratis Smart Contract Tool from source and have previously cloned the repository, please ensure that before you compile any smart contracts, you sync the repository to the latest version of the source code and rebuild the tool.
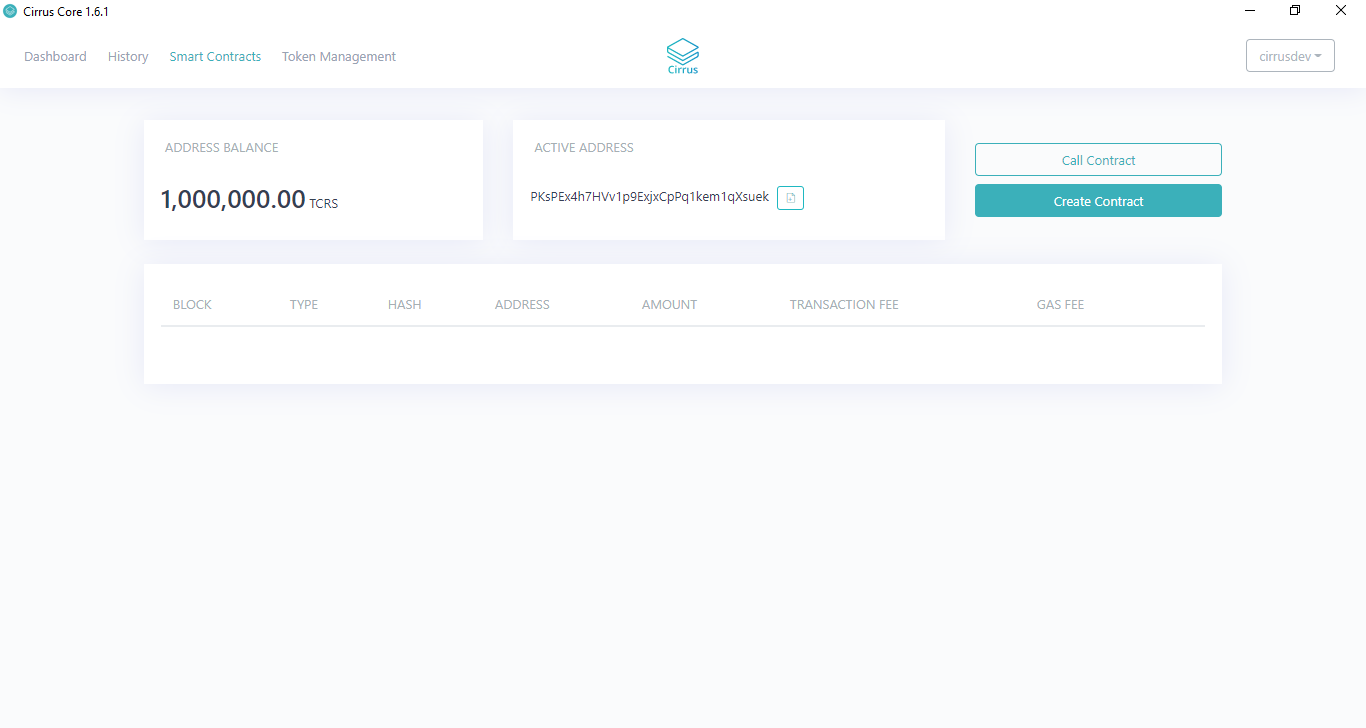
Deploying the HelloWorld smart contract
Begin by making sure that you have the Local Smart Contract network
running. You should now be in possession of 1,000,000 TCRS-TEST tokens
within your cirrusdev wallet. You can deploy the token from the Cirrus
Core UI or via Swagger which can be launched from the Wallet drop-down
in the top right. This tutorial will demonstrate the deployment from the
Cirrus Core GUI.
Navigate to the Smart Contracts tab within the Cirrus Core wallet and
select the Create Contract button
You will now be presented with the Create Contract dialog. To deploy the
contract, you will need to complete the relevant fields. Each member of
the object is fully documented in the
API.
Use the CIL code you generated in the previous section for
the Byte Code field.
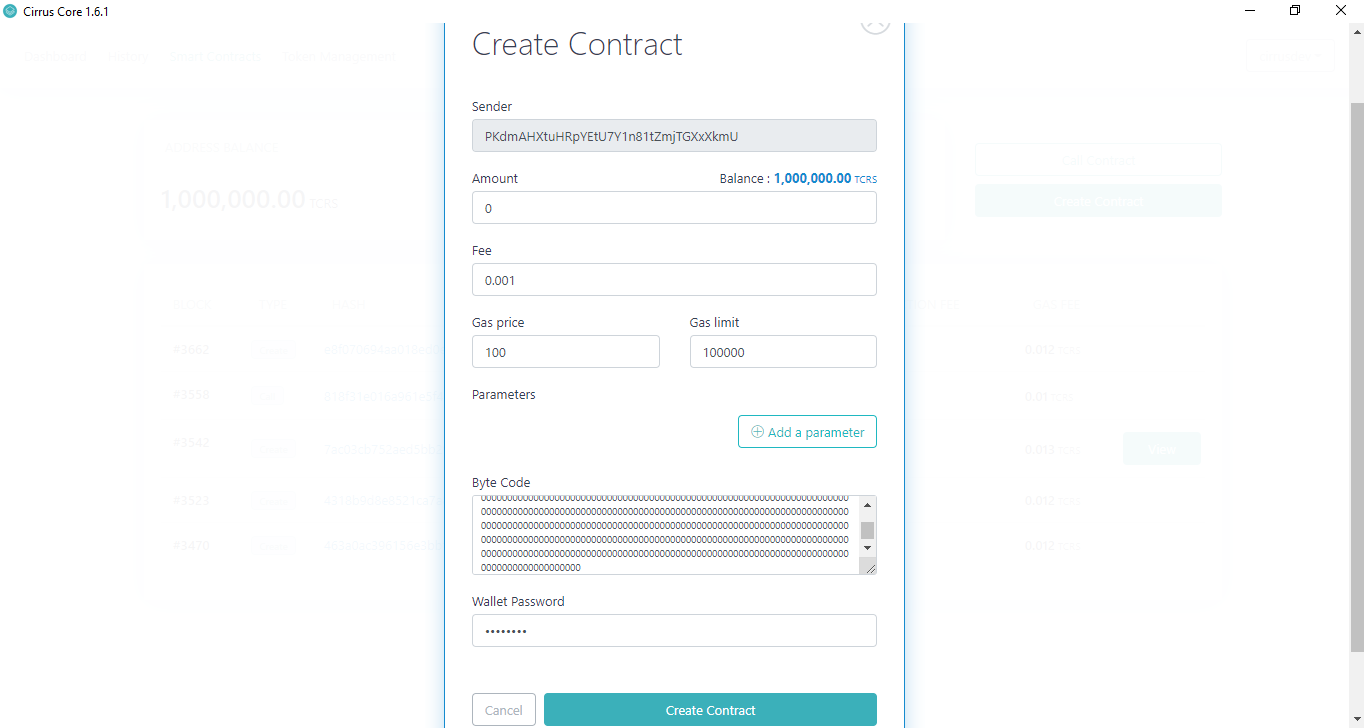
Once completed, select the Create Contract button to deploy the
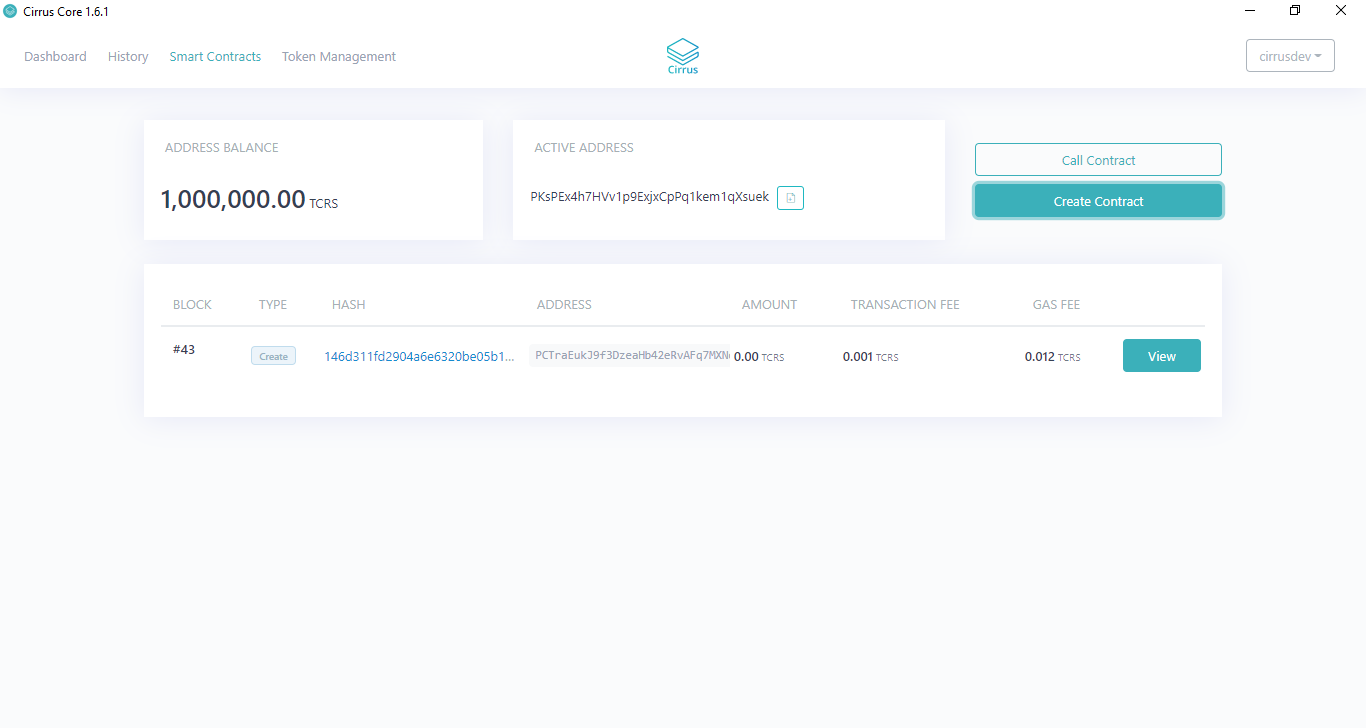
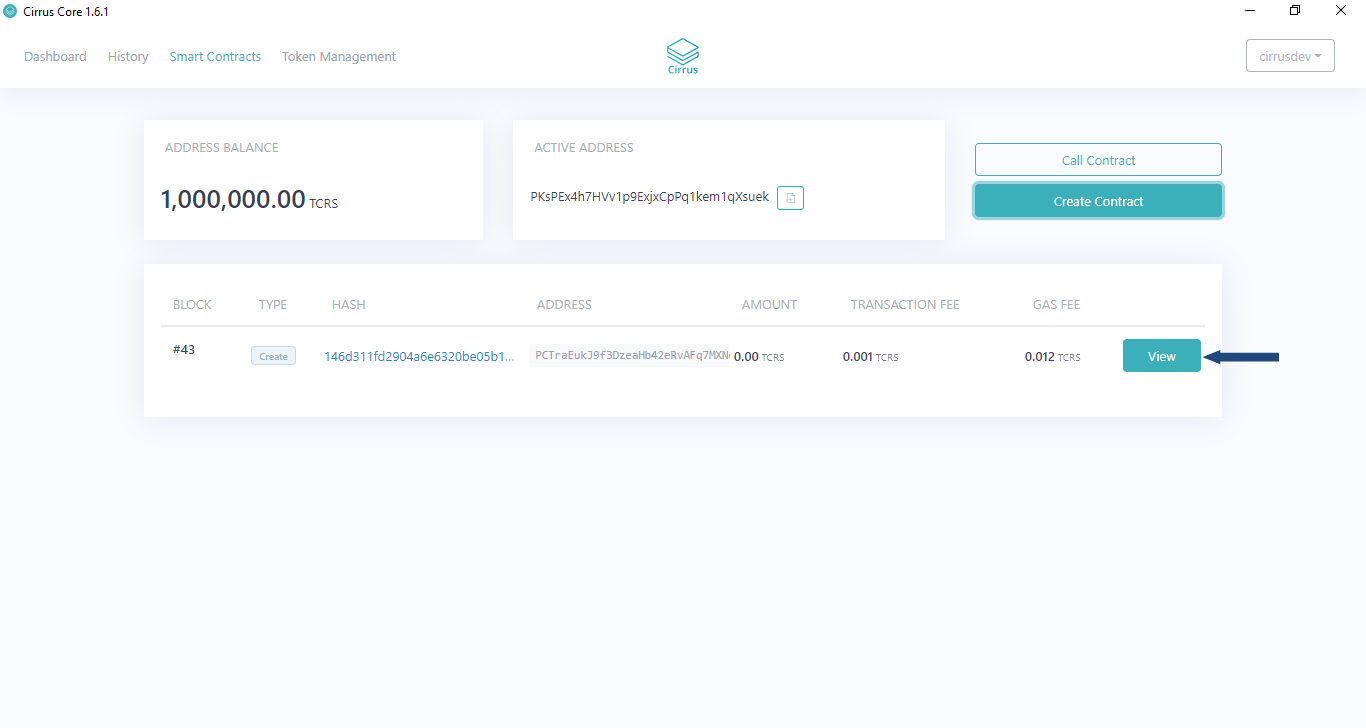
contract. Once deployed, the contract will be visible on
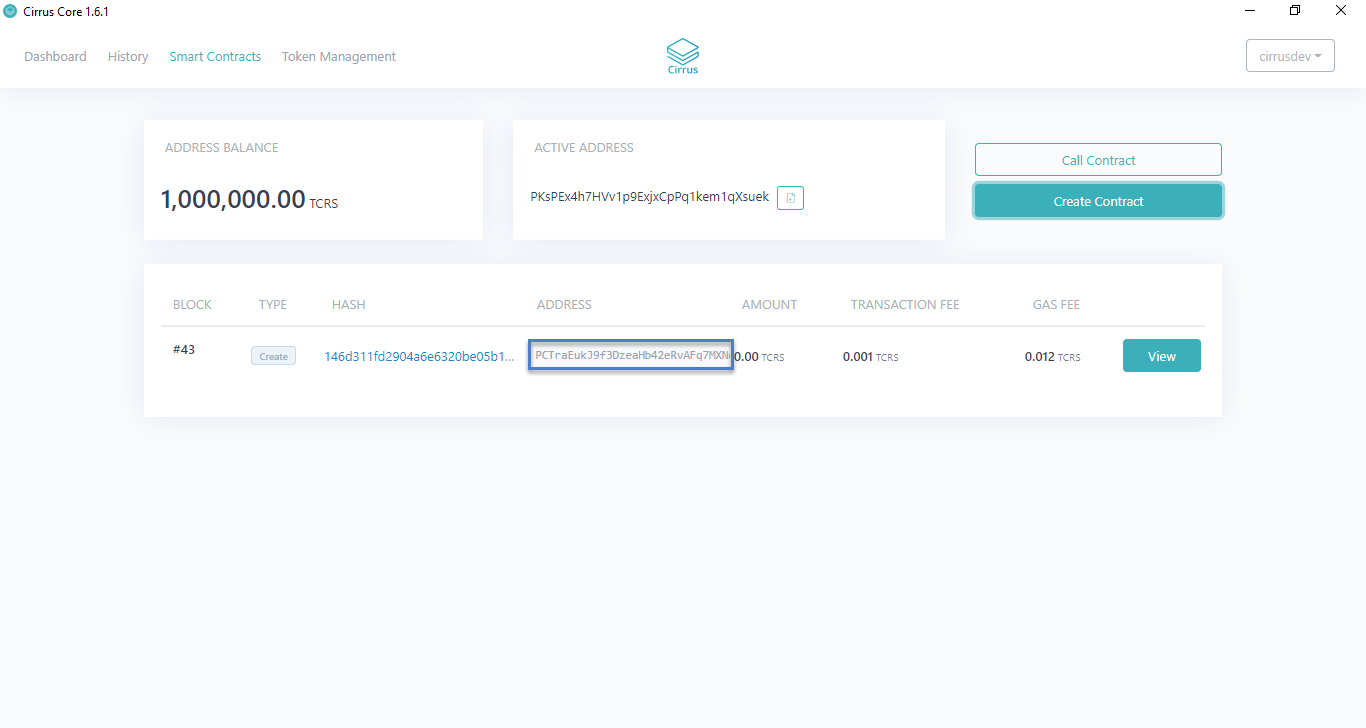
the Smart Contracts Dashboard as per below:
To interact with the deployed contract, you can simply select
the Browse API hyperlink to be directed to Swagger.
This will then launch your defined Internet Browser
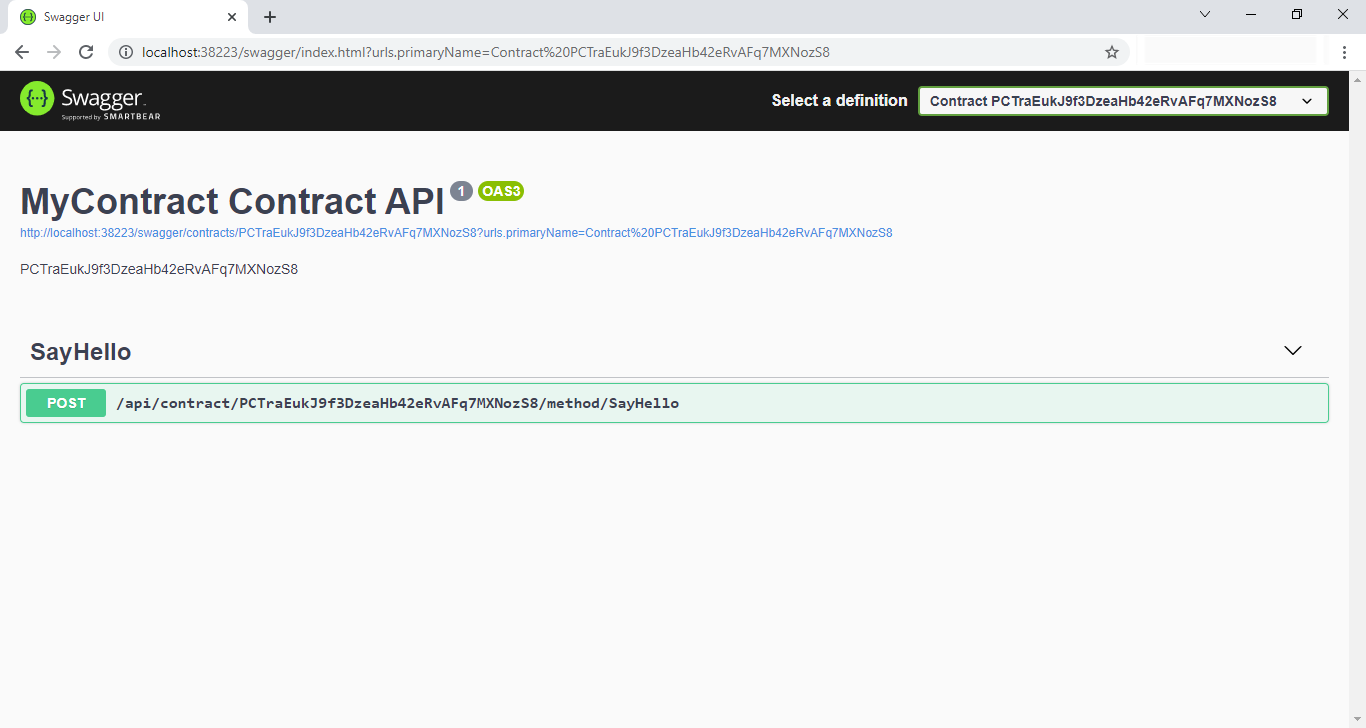
Select the SayHello post method to display the available parameters
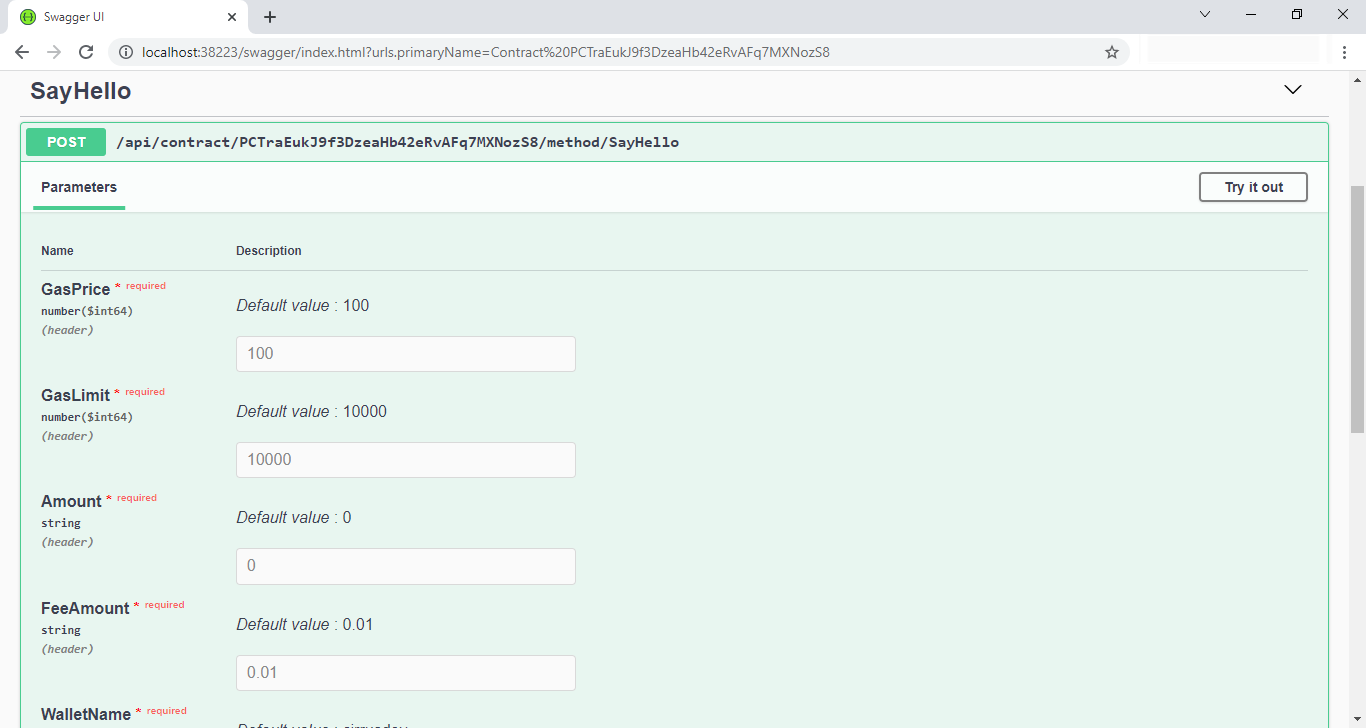
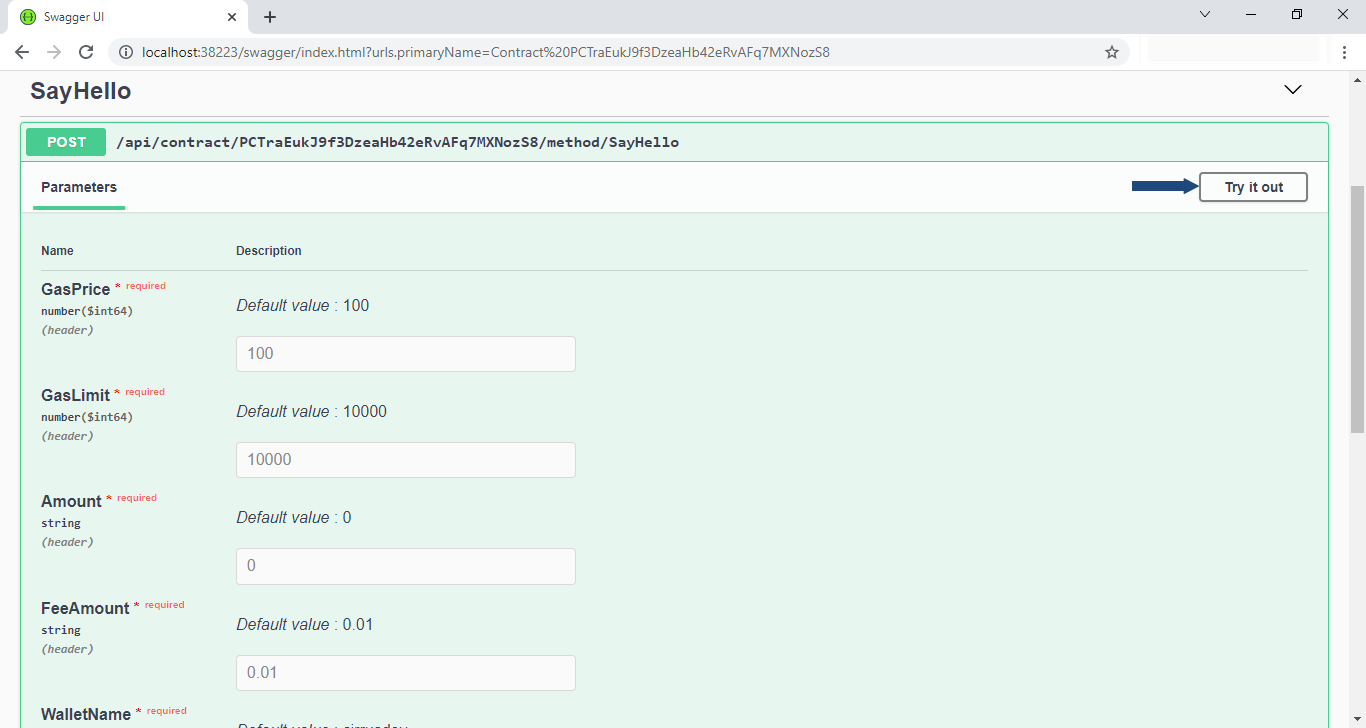
Calling the SayHello() method
We are going to call the SayHello() method, to do this click
the Try it out button.
A lot of the text fields are pre-populated, all that is required is to enter the password and replace the SayHello() string with ().
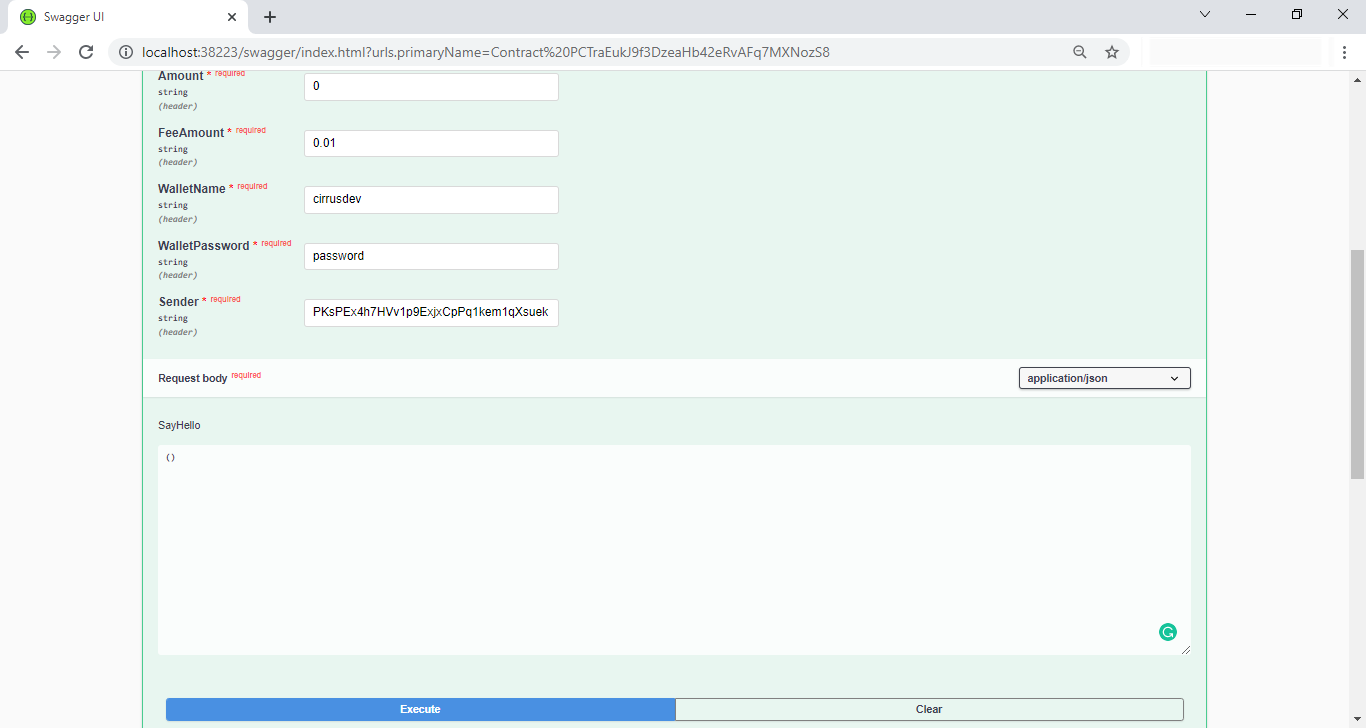
Click the Execute button to call the method. The response can be seen
below instantaneously.
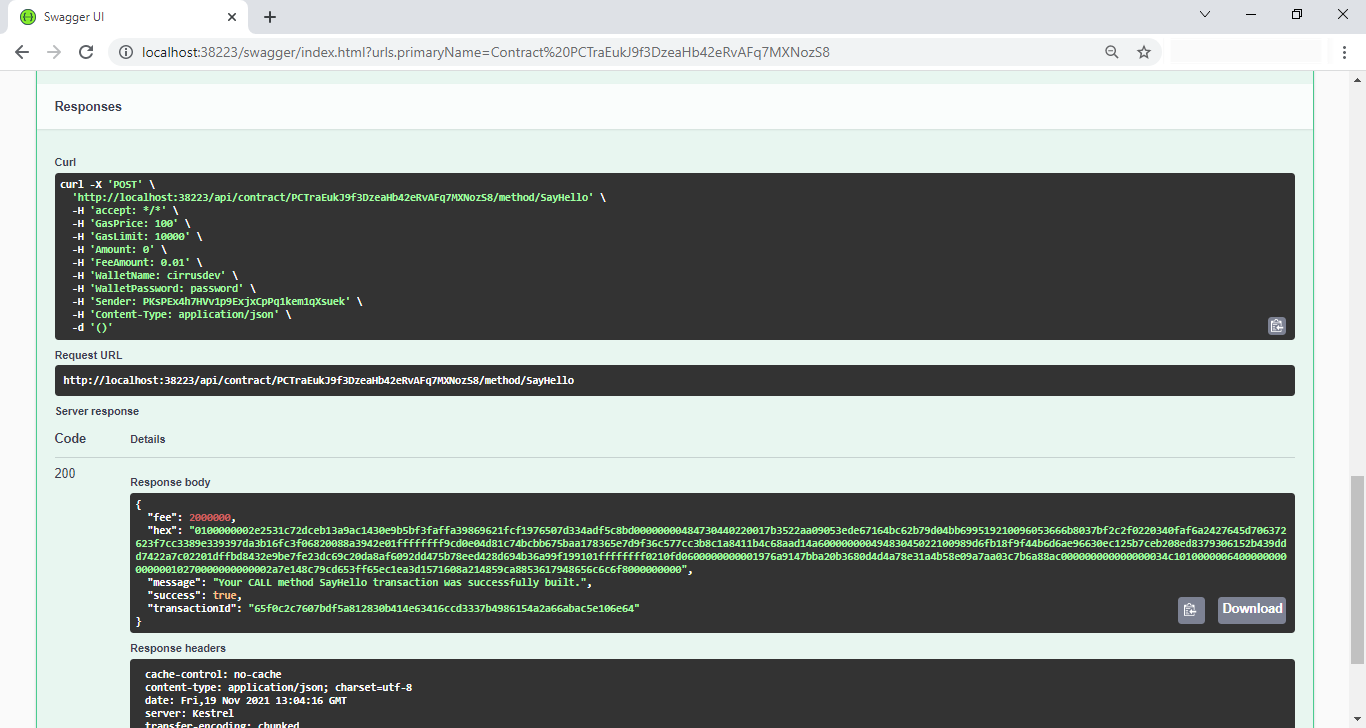
As detailed in the response, we need to check the receipt to view what
was returned from the Smart Contract. Navigate back to
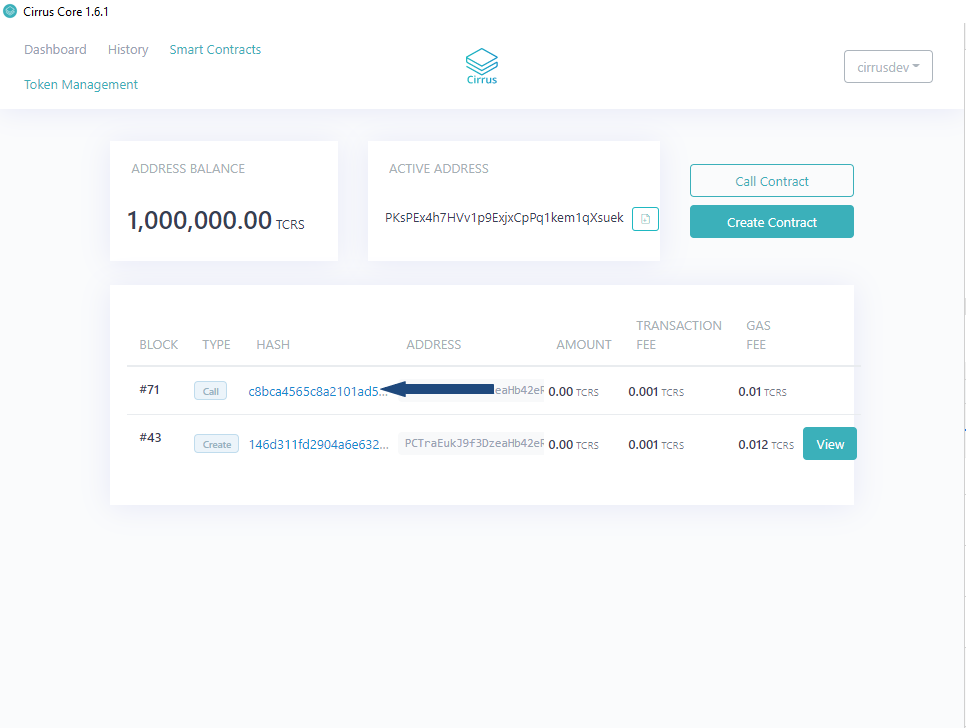
the Smart Contracts Dashboard within Cirrus Core where you will find
your balance has reduced slightly and in addition there is a new type of
Smart Contract execution listed.
Click the hyperlinked hash text to view the receipt.
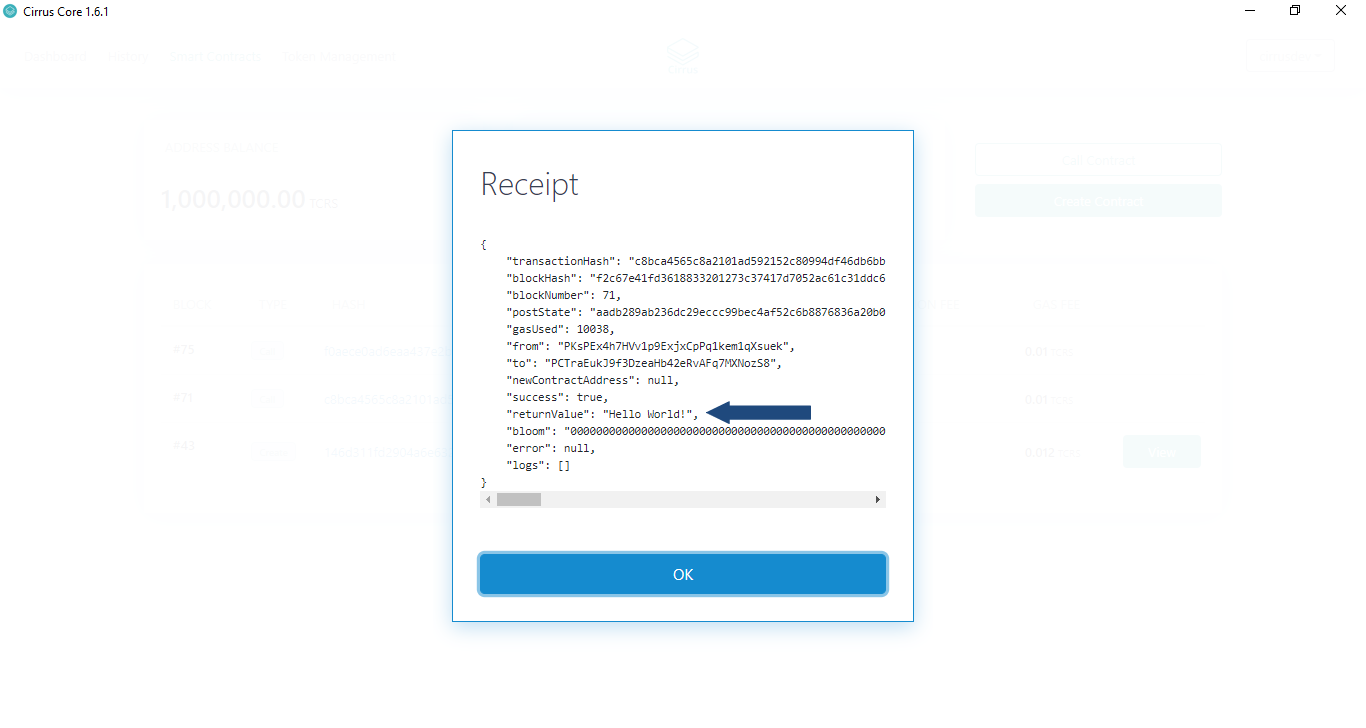
Upon clicking the hyperlinked text, you will be presented with a new
dialog that displays the receipt of the Smart Contract call. Here we can
see the returnValue proving that the Smart Contract call was successful!
Alternatively, you can call the contract from wallet as well. To call
it, just copy the contract address as depicted below and click call
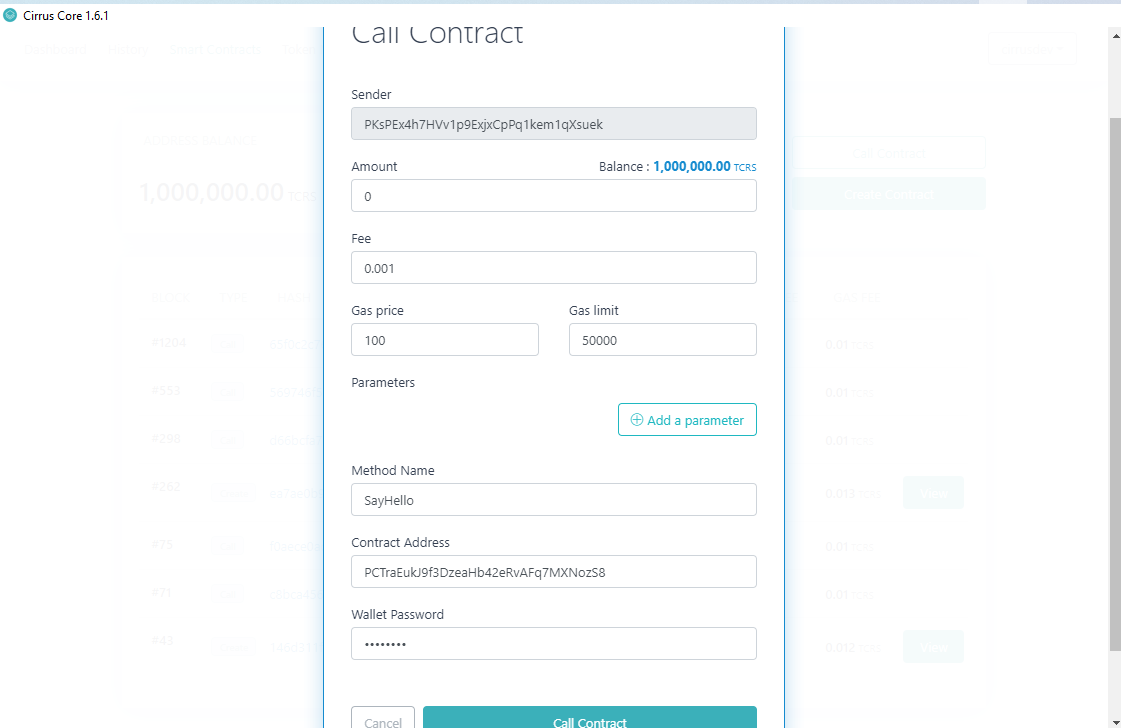
contract button.
Provide the method name, contract address, password, parameters, and click call contract as illustrated below.
Now we have deployed a basic HellowWorld contract, we can now look at extending the functionality in Tutorial 3.
